Uploading and downloading files are very common tasks for which developers need to write code in their applications.
In this article, You’ll learn how to upload and download files in a RESTful spring boot web service.
We’ll first build the REST APIs for uploading and downloading files, and then test those APIs using Postman. We’ll also write front-end code in javascript to upload files.
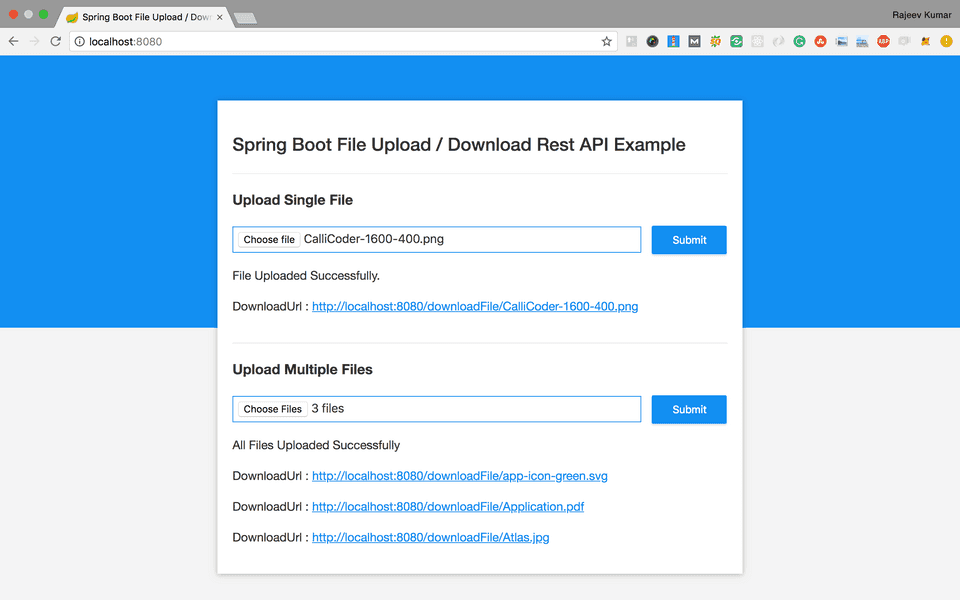
Following is the final version of our application -
Creating the Application
Let’s generate our application using Spring Boot CLI. Fire up your terminal, and type the following command to generate the app -
$ spring init --name=file-demo --dependencies=web file-demo
Using service at https://start.spring.io
Project extracted to '/Users/rajeevkumarsingh/spring-boot/file-demo'
You may also generate the application through Spring Initializr web tool by following the instructions below -
- Open http://start.spring.io
- Enter file-demo in the “Artifact” field.
- Enter com.example.filedemo in the “Package” field.
- Add Web in the “Dependencies” section.
- Click Generate to generate and download the project.
That’s it! You may now unzip the downloaded application archive and import it into your favorite IDE.
Configuring Server and File Storage Properties
First thing First! Let’s configure our Spring Boot application to enable Multipart file uploads, and define the maximum file size that can be uploaded. We’ll also configure the directory into which all the uploaded files will be stored.
Open src/main/resources/application.properties file, and add the following properties to it -
## MULTIPART (MultipartProperties)
# Enable multipart uploads
spring.servlet.multipart.enabled=true
# Threshold after which files are written to disk.
spring.servlet.multipart.file-size-threshold=2KB
# Max file size.
spring.servlet.multipart.max-file-size=200MB
# Max Request Size
spring.servlet.multipart.max-request-size=215MB

## File Storage Properties
# All files uploaded through the REST API will be stored in this directory
file.upload-dir=/Users/callicoder/uploads
Note: Please change the
file.upload-dirproperty to the path where you want the uploaded files to be stored.
Automatically binding properties to a POJO class
Spring Boot has an awesome feature called @ConfigurationProperties using which you can automatically bind the properties defined in the application.properties file to a POJO class.
Let’s define a POJO class called FileStorageProperties inside com.example.filedemo.property package to bind all the file storage properties -
package com.example.filedemo.property;

import org.springframework.boot.context.properties.ConfigurationProperties;

@ConfigurationProperties(prefix = "file")
public class FileStorageProperties {
    private String uploadDir;

    public String getUploadDir() {
        return uploadDir;
    }

    public void setUploadDir(String uploadDir) {
        this.uploadDir = uploadDir;
    }
}
The @ConfigurationProperties(prefix = "file") annotation does its job on application startup and binds all the properties with prefix file to the corresponding fields of the POJO class.
If you define additional file properties in future, you may simply add a corresponding field in the above class, and spring boot will automatically bind the field with the property value.
Enable Configuration Properties
Now, To enable the ConfigurationProperties feature, you need to add @EnableConfigurationProperties annotation to any configuration class.
Open the main class src/main/java/com/example/filedemo/FileDemoApplication.java, and add the @EnableConfigurationProperties annotation to it like so -
package com.example.filedemo;

import com.example.filedemo.property.FileStorageProperties;
import org.springframework.boot.SpringApplication;
import org.springframework.boot.autoconfigure.SpringBootApplication;
import org.springframework.boot.context.properties.EnableConfigurationProperties;

@SpringBootApplication
@EnableConfigurationProperties({
        FileStorageProperties.class
})
public class FileDemoApplication {

    public static void main(String[] args) {
        SpringApplication.run(FileDemoApplication.class, args);
    }
}
Writing APIs for File Upload and Download
Let’s now write the REST APIs for uploading and downloading files. Create a new controller class called FileController inside com.example.filedemo.controller package.
Here is the complete code for FileController -
package com.example.filedemo.controller;

import com.example.filedemo.payload.UploadFileResponse;
import com.example.filedemo.service.FileStorageService;
import org.slf4j.Logger;
import org.slf4j.LoggerFactory;
import org.springframework.beans.factory.annotation.Autowired;
import org.springframework.core.io.Resource;
import org.springframework.http.HttpHeaders;
import org.springframework.http.MediaType;
import org.springframework.http.ResponseEntity;
import org.springframework.web.bind.annotation.*;
import org.springframework.web.multipart.MultipartFile;
import org.springframework.web.servlet.support.ServletUriComponentsBuilder;
import javax.servlet.http.HttpServletRequest;
import java.io.IOException;
import java.util.Arrays;
import java.util.List;
import java.util.stream.Collectors;

@RestController
public class FileController {

    private static final Logger logger = LoggerFactory.getLogger(FileController.class);

    @Autowired
    private FileStorageService fileStorageService;

    @PostMapping("/uploadFile")
    public UploadFileResponse uploadFile(@RequestParam("file") MultipartFile file) {
        String fileName = fileStorageService.storeFile(file);

        String fileDownloadUri = ServletUriComponentsBuilder.fromCurrentContextPath()
                .path("/downloadFile/")
                .path(fileName)
                .toUriString();

        return new UploadFileResponse(fileName, fileDownloadUri,
                file.getContentType(), file.getSize());
    }

    @PostMapping("/uploadMultipleFiles")
    public List<UploadFileResponse> uploadMultipleFiles(@RequestParam("files") MultipartFile[] files) {
        return Arrays.asList(files)
                .stream()
                .map(file -> uploadFile(file))
                .collect(Collectors.toList());
    }

    @GetMapping("/downloadFile/{fileName:.+}")
    public ResponseEntity<Resource> downloadFile(@PathVariable String fileName, HttpServletRequest request) {
        // Load file as Resource
        Resource resource = fileStorageService.loadFileAsResource(fileName);

        // Try to determine file's content type
        String contentType = null;
        try {
            contentType = request.getServletContext().getMimeType(resource.getFile().getAbsolutePath());
        } catch (IOException ex) {
            logger.info("Could not determine file type.");
        }

        // Fallback to the default content type if type could not be determined
        if(contentType == null) {
            contentType = "application/octet-stream";
        }

        return ResponseEntity.ok()
                .contentType(MediaType.parseMediaType(contentType))
                .header(HttpHeaders.CONTENT_DISPOSITION, "attachment; filename=\"" + resource.getFilename() + "\"")
                .body(resource);
    }
}
The FileController class uses FileStorageService for storing files in the file system and retrieving them. It returns a payload of type UploadFileResponse after the upload is completed. Let’s define these classes one by one.
UploadFileResponse
As the name suggests, this class is used to return the response from the /uploadFile and /uploadMultipleFiles APIs.
Create UploadFileResponse class inside com.example.filedemo.payload package with the following contents -
package com.example.filedemo.payload;

public class UploadFileResponse {
    private String fileName;
    private String fileDownloadUri;
    private String fileType;
    private long size;

    public UploadFileResponse(String fileName, String fileDownloadUri, String fileType, long size) {
        this.fileName = fileName;
        this.fileDownloadUri = fileDownloadUri;
        this.fileType = fileType;
        this.size = size;
    }

	// Getters and Setters (Omitted for brevity)
}
Service for Storing Files in the FileSystem and retrieving them
Let’s now write the service for storing files in the file system and retrieving them. Create a new class called FileStorageService.java inside com.example.filedemo.service package with the following contents -
package com.example.filedemo.service;

import com.example.filedemo.exception.FileStorageException;
import com.example.filedemo.exception.MyFileNotFoundException;
import com.example.filedemo.property.FileStorageProperties;
import org.springframework.beans.factory.annotation.Autowired;
import org.springframework.core.io.Resource;
import org.springframework.core.io.UrlResource;
import org.springframework.stereotype.Service;
import org.springframework.util.StringUtils;
import org.springframework.web.multipart.MultipartFile;
import java.io.IOException;
import java.net.MalformedURLException;
import java.nio.file.Files;
import java.nio.file.Path;
import java.nio.file.Paths;
import java.nio.file.StandardCopyOption;

@Service
public class FileStorageService {

    private final Path fileStorageLocation;

    @Autowired
    public FileStorageService(FileStorageProperties fileStorageProperties) {
        this.fileStorageLocation = Paths.get(fileStorageProperties.getUploadDir())
                .toAbsolutePath().normalize();

        try {
            Files.createDirectories(this.fileStorageLocation);
        } catch (Exception ex) {
            throw new FileStorageException("Could not create the directory where the uploaded files will be stored.", ex);
        }
    }

    public String storeFile(MultipartFile file) {
        // Normalize file name
        String fileName = StringUtils.cleanPath(file.getOriginalFilename());

        try {
            // Check if the file's name contains invalid characters
            if(fileName.contains("..")) {
                throw new FileStorageException("Sorry! Filename contains invalid path sequence " + fileName);
            }

            // Copy file to the target location (Replacing existing file with the same name)
            Path targetLocation = this.fileStorageLocation.resolve(fileName);
            Files.copy(file.getInputStream(), targetLocation, StandardCopyOption.REPLACE_EXISTING);

            return fileName;
        } catch (IOException ex) {
            throw new FileStorageException("Could not store file " + fileName + ". Please try again!", ex);
        }
    }

    public Resource loadFileAsResource(String fileName) {
        try {
            Path filePath = this.fileStorageLocation.resolve(fileName).normalize();
            Resource resource = new UrlResource(filePath.toUri());
            if(resource.exists()) {
                return resource;
            } else {
                throw new MyFileNotFoundException("File not found " + fileName);
            }
        } catch (MalformedURLException ex) {
            throw new MyFileNotFoundException("File not found " + fileName, ex);
        }
    }
}
Exception Classes
The FileStorageService class throws some exceptions in case of unexpected situations. Following are the definitions of those exception classes (All the exception classes go inside the package com.example.filedemo.exception).
1. FileStorageException
It’s thrown when an unexpected situation occurs while storing a file in the file system -
package com.example.filedemo.exception;

public class FileStorageException extends RuntimeException {
    public FileStorageException(String message) {
        super(message);
    }

    public FileStorageException(String message, Throwable cause) {
        super(message, cause);
    }
}
2. MyFileNotFoundException
It’s thrown when a file that the user is trying to download is not found.
package com.example.filedemo.exception;

import org.springframework.http.HttpStatus;
import org.springframework.web.bind.annotation.ResponseStatus;

@ResponseStatus(HttpStatus.NOT_FOUND)
public class MyFileNotFoundException extends RuntimeException {
    public MyFileNotFoundException(String message) {
        super(message);
    }

    public MyFileNotFoundException(String message, Throwable cause) {
        super(message, cause);
    }
}
Note that, we’ve annotated the above exception class with @ResponseStatus(HttpStatus.NOT_FOUND). This ensures that Spring boot responds with a 404 Not Found status when this exception is thrown.
Running the Application and Testing the APIs via Postman
We’re done developing our backend APIs. Let’s run the application and test the APIs via Postman. Type the following command from the root directory of the project to run the application -
mvn spring-boot:runOnce started, the application can be accessed at http://localhost:8080.
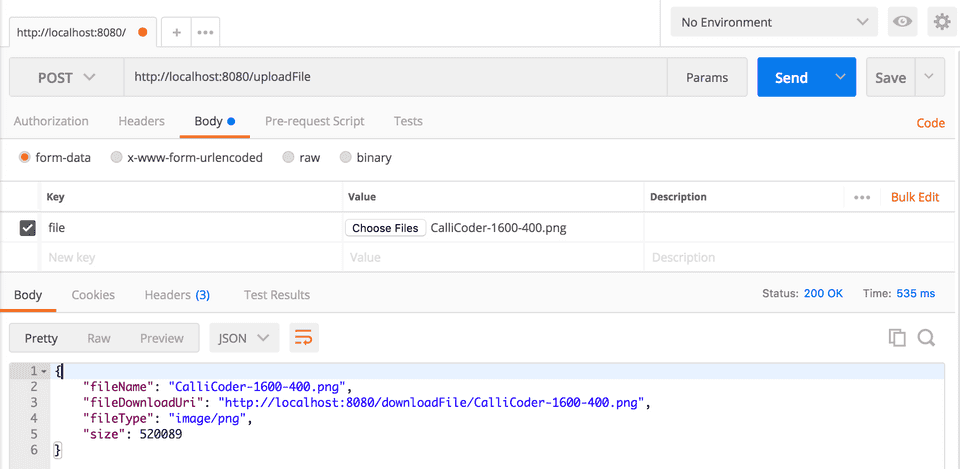
1. Upload File
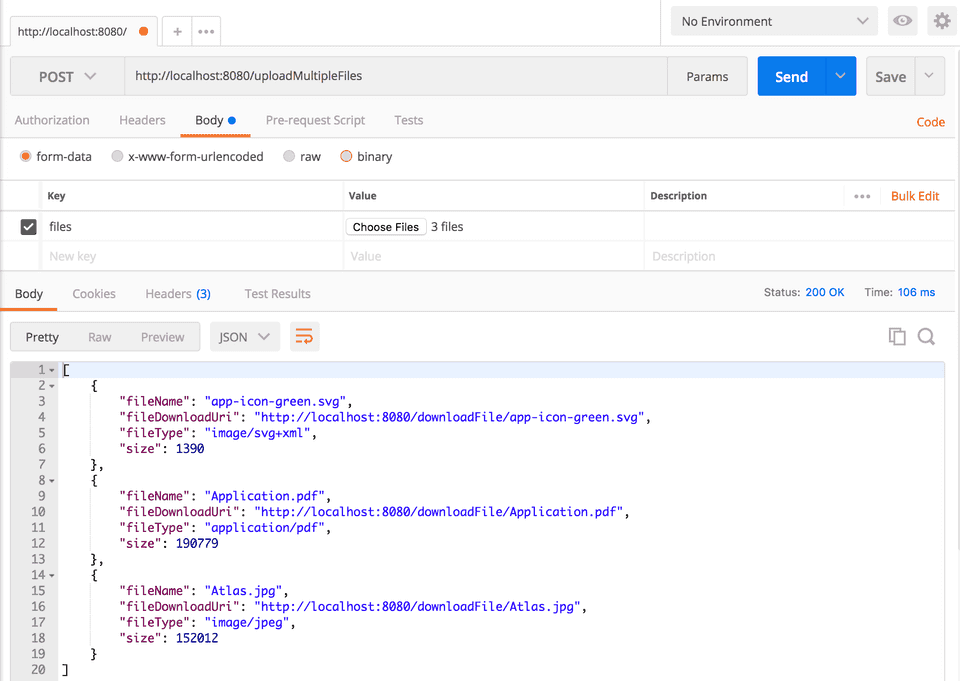
2. Upload Multiple Files
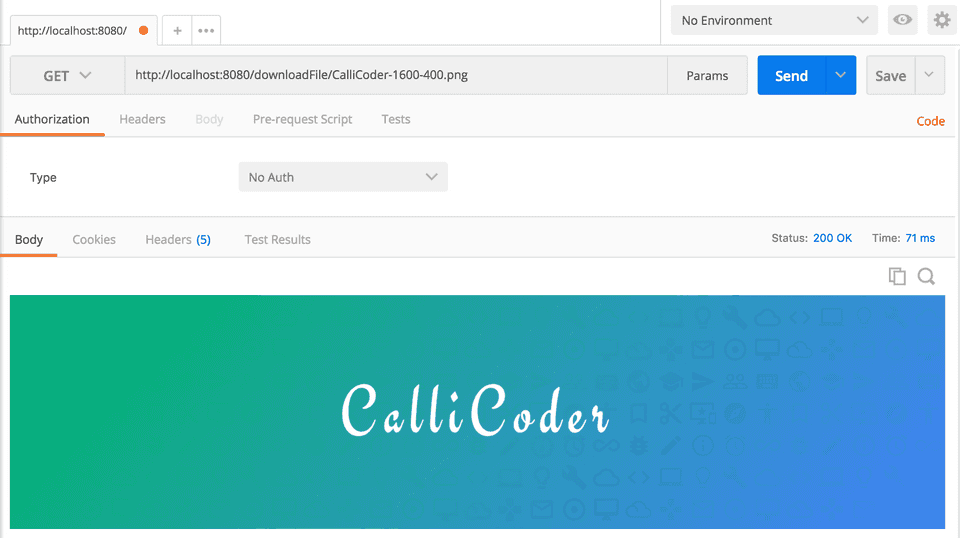
3. Download File
Developing the Front End
Our backend APIs are working fine. Let’s now write the front end code to let users upload and download files from our web app.
All the front end files will go inside src/main/resources/static folder. Following is the directory structure of our front-end code -
static
  └── css
       └── main.css
  └── js
       └── main.js
  └── index.html
A bit of HTML
<!DOCTYPE html>
<html>
    <head>
        <meta name="viewport" content="width=device-width, initial-scale=1.0, minimum-scale=1.0">
        <title>Spring Boot File Upload / Download Rest API Example</title>
        <link rel="stylesheet" href="/css/main.css" />
    </head>
    <body>
        <noscript>
            <h2>Sorry! Your browser doesn't support Javascript</h2>
        </noscript>
        <div class="upload-container">
            <div class="upload-header">
                <h2>Spring Boot File Upload / Download Rest API Example</h2>
            </div>
            <div class="upload-content">
                <div class="single-upload">
                    <h3>Upload Single File</h3>
                    <form id="singleUploadForm" name="singleUploadForm">
                        <input id="singleFileUploadInput" type="file" name="file" class="file-input" required />
                        <button type="submit" class="primary submit-btn">Submit</button>
                    </form>
                    <div class="upload-response">
                        <div id="singleFileUploadError"></div>
                        <div id="singleFileUploadSuccess"></div>
                    </div>
                </div>
                <div class="multiple-upload">
                    <h3>Upload Multiple Files</h3>
                    <form id="multipleUploadForm" name="multipleUploadForm">
                        <input id="multipleFileUploadInput" type="file" name="files" class="file-input" multiple required />
                        <button type="submit" class="primary submit-btn">Submit</button>
                    </form>
                    <div class="upload-response">
                        <div id="multipleFileUploadError"></div>
                        <div id="multipleFileUploadSuccess"></div>
                    </div>
                </div>
            </div>
        </div>
        <script src="/js/main.js" ></script>
    </body>
</html>
Some Javascript
'use strict';

var singleUploadForm = document.querySelector('#singleUploadForm');
var singleFileUploadInput = document.querySelector('#singleFileUploadInput');
var singleFileUploadError = document.querySelector('#singleFileUploadError');
var singleFileUploadSuccess = document.querySelector('#singleFileUploadSuccess');

var multipleUploadForm = document.querySelector('#multipleUploadForm');
var multipleFileUploadInput = document.querySelector('#multipleFileUploadInput');
var multipleFileUploadError = document.querySelector('#multipleFileUploadError');
var multipleFileUploadSuccess = document.querySelector('#multipleFileUploadSuccess');

function uploadSingleFile(file) {
    var formData = new FormData();
    formData.append("file", file);

    var xhr = new XMLHttpRequest();
    xhr.open("POST", "/uploadFile");

    xhr.onload = function() {
        console.log(xhr.responseText);
        var response = JSON.parse(xhr.responseText);
        if(xhr.status == 200) {
            singleFileUploadError.style.display = "none";
            singleFileUploadSuccess.innerHTML = "<p>File Uploaded Successfully.</p><p>DownloadUrl : <a href='" + response.fileDownloadUri + "' target='_blank'>" + response.fileDownloadUri + "</a></p>";
            singleFileUploadSuccess.style.display = "block";
        } else {
            singleFileUploadSuccess.style.display = "none";
            singleFileUploadError.innerHTML = (response && response.message) || "Some Error Occurred";
        }
    }

    xhr.send(formData);
}

function uploadMultipleFiles(files) {
    var formData = new FormData();
    for(var index = 0; index < files.length; index++) {
        formData.append("files", files[index]);
    }

    var xhr = new XMLHttpRequest();
    xhr.open("POST", "/uploadMultipleFiles");

    xhr.onload = function() {
        console.log(xhr.responseText);
        var response = JSON.parse(xhr.responseText);
        if(xhr.status == 200) {
            multipleFileUploadError.style.display = "none";
            var content = "<p>All Files Uploaded Successfully</p>";
            for(var i = 0; i < response.length; i++) {
                content += "<p>DownloadUrl : <a href='" + response[i].fileDownloadUri + "' target='_blank'>" + response[i].fileDownloadUri + "</a></p>";
            }
            multipleFileUploadSuccess.innerHTML = content;
            multipleFileUploadSuccess.style.display = "block";
        } else {
            multipleFileUploadSuccess.style.display = "none";
            multipleFileUploadError.innerHTML = (response && response.message) || "Some Error Occurred";
        }
    }

    xhr.send(formData);
}


singleUploadForm.addEventListener('submit', function(event){
    var files = singleFileUploadInput.files;
    if(files.length === 0) {
        singleFileUploadError.innerHTML = "Please select a file";
        singleFileUploadError.style.display = "block";
    }
    uploadSingleFile(files[0]);
    event.preventDefault();
}, true);


multipleUploadForm.addEventListener('submit', function(event){
    var files = multipleFileUploadInput.files;
    if(files.length === 0) {
        multipleFileUploadError.innerHTML = "Please select at least one file";
        multipleFileUploadError.style.display = "block";
    }
    uploadMultipleFiles(files);
    event.preventDefault();
}, true);
The above code is self explanatory. I’m using XMLHttpRequest along with FormData object to upload file(s) as multipart/form-data.
And some CSS
* {
    -webkit-box-sizing: border-box;
    -moz-box-sizing: border-box;
    box-sizing: border-box;
}

body {
    margin: 0;
    padding: 0;
    font-weight: 400;
    font-family: "Helvetica Neue", Helvetica, Arial, sans-serif;
    font-size: 1rem;
    line-height: 1.58;
    color: #333;
    background-color: #f4f4f4;
}

body:before {
    height: 50%;
    width: 100%;
    position: absolute;
    top: 0;
    left: 0;
    background: #128ff2;
    content: "";
    z-index: 0;
}

.clearfix:after {
    display: block;
    content: "";
    clear: both;
}


h1, h2, h3, h4, h5, h6 {
    margin-top: 20px;
    margin-bottom: 20px;
}

h1 {
    font-size: 1.7em;
}

a {
    color: #128ff2;
}

button {
    box-shadow: none;
    border: 1px solid transparent;
    font-size: 14px;
    outline: none;
    line-height: 100%;
    white-space: nowrap;
    vertical-align: middle;
    padding: 0.6rem 1rem;
    border-radius: 2px;
    transition: all 0.2s ease-in-out;
    cursor: pointer;
    min-height: 38px;
}

button.primary {
    background-color: #128ff2;
    box-shadow: 0 2px 2px 0 rgba(0, 0, 0, 0.12);
    color: #fff;
}

input {
    font-size: 1rem;
}

input[type="file"] {
    border: 1px solid #128ff2;
    padding: 6px;
    max-width: 100%;
}

.file-input {
    width: 100%;
}

.submit-btn {
    display: block;
    margin-top: 15px;
    min-width: 100px;
}

@media screen and (min-width: 500px) {
    .file-input {
        width: calc(100% - 115px);
    }

    .submit-btn {
        display: inline-block;
        margin-top: 0;
        margin-left: 10px;
    }
}

.upload-container {
      max-width: 700px;
      margin-left: auto;
      margin-right: auto;
      background-color: #fff;
      box-shadow: 0 1px 11px rgba(0, 0, 0, 0.27);
      margin-top: 60px;
      min-height: 400px;
      position: relative;
      padding: 20px;
}

.upload-header {
    border-bottom: 1px solid #ececec;
}

.upload-header h2 {
    font-weight: 500;
}

.single-upload {
    padding-bottom: 20px;
    margin-bottom: 20px;
    border-bottom: 1px solid #e8e8e8;
}

.upload-response {
    overflow-x: hidden;
    word-break: break-all;
}
If you use JQuery
If you prefer using jQuery instead of vanilla javascript, then you can upload files using jQuery.ajax() method like so -
$('#singleUploadForm').submit(function(event) {
    var formElement = this;
    // You can directly create form data from the form element
    // (Or you could get the files from input element and append them to FormData as we did in vanilla javascript)
    var formData = new FormData(formElement);

    $.ajax({
        type: "POST",
        enctype: 'multipart/form-data',
        url: "/uploadFile",
        data: formData,
        processData: false,
        contentType: false,
        success: function (response) {
            console.log(response);
            // process response
        },
        error: function (error) {
            console.log(error);
            // process error
        }
    });

    event.preventDefault();
});
Conclusion
All right folks! In this article, we learned how to upload single as well as multiple files via REST APIs written in Spring Boot. We also learned how to download files in Spring Boot. Finally, we wrote code to upload files by calling the APIs through javascript.
I hope the post was helpful to you. You can download the entire code for the project that we built in this article from the github repository.
If you want to store files in MySQL database instead of the local file system, then check out the following article -
Spring Boot File Upload / Download with JPA, Hibernate, and MySQL database
Thank you for reading! See you in the next post!


