Scaffolding, in modern web apps, has been made popular by tools like yeoman. These tools generate a standard prototype for your project with everything you need to get up and running, including the directory structure, the build system, the project dependencies etc.
Spring Boot has its own scaffolding tool. There are two ways to quickly bootstrap your Spring boot application -
- Using Spring Initializer web app hosted at http://start.spring.io
- Using Spring Boot CLI
Spring Initializer
Spring Initializer is a web tool which helps in quickly bootstrapping spring boot projects.
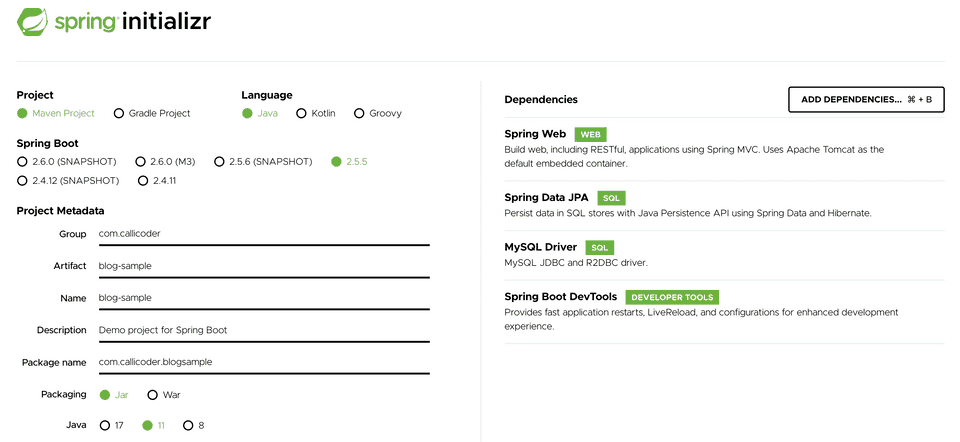
The tool is very simple to use. You just need to enter your project details and required dependencies. The tool will generate and download a zip file containing a standard spring boot project based on the details you have entered.
Follow these steps to generate a new project using Spring Initializer web app -
Step 1. Go to http://start.spring.io.
Step 2. Choose Maven Project or Gradle Project in the Project section. Maven Project is the default.
Step 3. Select the language of your choice Java, Kotlin, or Groovy. Java is the default
Step 4. Select the Spring Boot version. The current stable release is the default.
Step 5. Enter group, artifact, and name in the Project metadata.
Step 6. Search for dependencies in the Dependencies section and press enter to add them to your project.
Step 7. Once you have selected all the dependencies and entered the project details, click Generate to generate your project.
The tool will generate and download a zip file containing your project’s prototype. The generated prototype will have all the project directories, the main application class and the pom.xml or build.gradle file with all the dependencies you had selected.
Just unzip the file and import it in an IDE of your choice and start working.
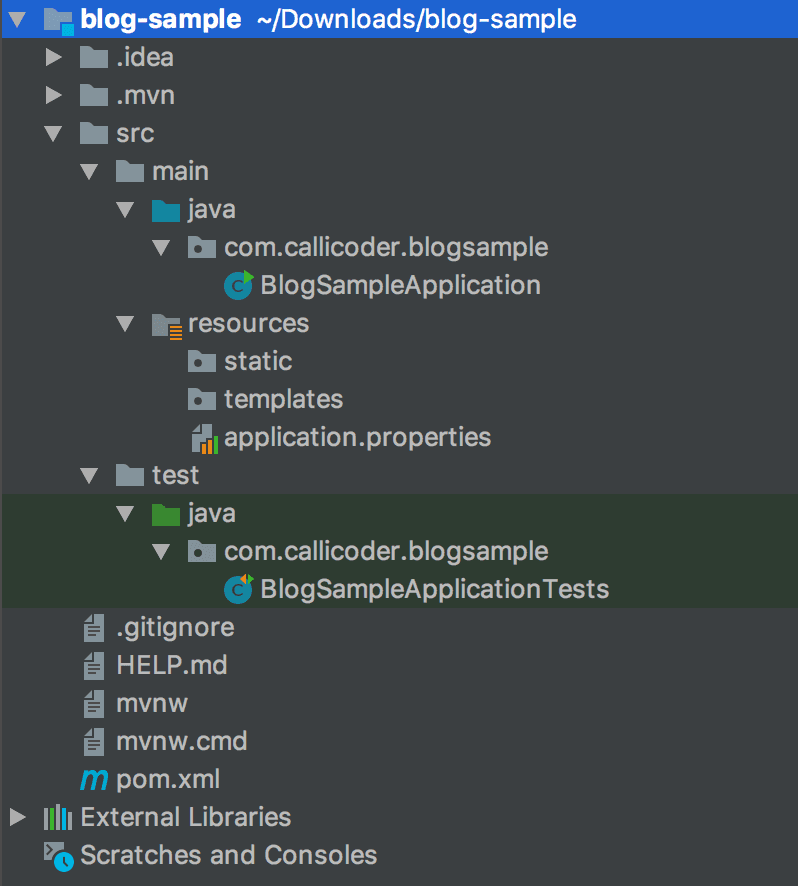
I created a maven project using Spring Initializer while writing this post and here is what I got -
You see! I’ve got everything that is needed to get started. A standard spring boot project structure containing all the required directories along with a pom.xml file containing all the dependencies.
You can go to the project’s root directory and type the following command in your terminal to run the application.
$ mvn spring-boot:runIf you have generated a gradle project, you can run it using -
$ gradle bootRunSpring Boot CLI
Spring Boot CLI is a command line tool that helps in quickly prototyping with Spring. You can also run Groovy scripts using this tool.
Checkout the Official Spring Boot documentation for instructions on how to install Spring Boot CLI for your operating system. Once installed, type the following command to see what you can do with Spring Boot CLI -
$ spring --help

usage: spring [--help] [--version]
       <command> [<args>]

Available commands are:

  run [options] <files> [--] [args]
    Run a spring groovy script

  grab
    Download a spring groovy scripts dependencies to ./repository

  jar [options] <jar-name> <files>
    Create a self-contained executable jar file from a Spring Groovy script

  war [options] <war-name> <files>
    Create a self-contained executable war file from a Spring Groovy script

  install [options] <coordinates>
    Install dependencies to the lib/ext directory

  uninstall [options] <coordinates>
    Uninstall dependencies from the lib/ext directory

  init [options] [location]
    Initialize a new project using Spring Initializr (start.spring.io)

  encodepassword [options] <password to encode>
    Encode a password for use with Spring Security

  shell
    Start a nested shell

Common options:

  --debug Verbose mode
    Print additional status information for the command you are running


See 'spring help <command>' for more information on a specific command.
In this post, we’ll look at spring init command to generate a new spring boot project. The spring init command internally uses Spring Initializr web app to generate and download the project.
Open your terminal and type -
$ spring help initto get all the information about init command.
Following are few examples of how to use the command -
To list all the capabilities of the service:
    $ spring init --list

To creates a default project:
    $ spring init

To create a web my-app.zip:
    $ spring init -d=web my-app.zip

To create a web/data-jpa gradle project unpacked:
    $ spring init -d=web,jpa --build=gradle my-dir
Let’s generate a maven web application with JPA, Mysql and Thymleaf dependencies -
$ spring init -n=blog-sample -d=web,data-jpa,mysql,devtools,thymeleaf -g=com.callicoder -a=blog-sample

Using service at https://start.spring.io
Content saved to 'blog-sample.zip'
This command will create a new spring boot project with all the specified settings.
Quick and Simple! isn’t it?
Conclusion
Congratulations folks! We explored two ways of quickly bootstrapping spring boot applications. I always use one of these two methods whenever I have to work with a new Spring Boot app. It saves a lot of time for me.
I prefer using Spring-CLI because It allows me to do everything from the command line. Let me know which method do you prefer by commenting in the comment section below.

