In this post, you’ll learn how to use FXML, an XML based language provided by JavaFX, to create the user interface for your Desktop application.
FXML allows you to write the user interface separate from the application logic, thereby making the code easier to maintain.
In an earlier post in JavaFX, I wrote about how to create a registration form GUI using Java code. In this post, I’ll show you how to build the same app using FXML.
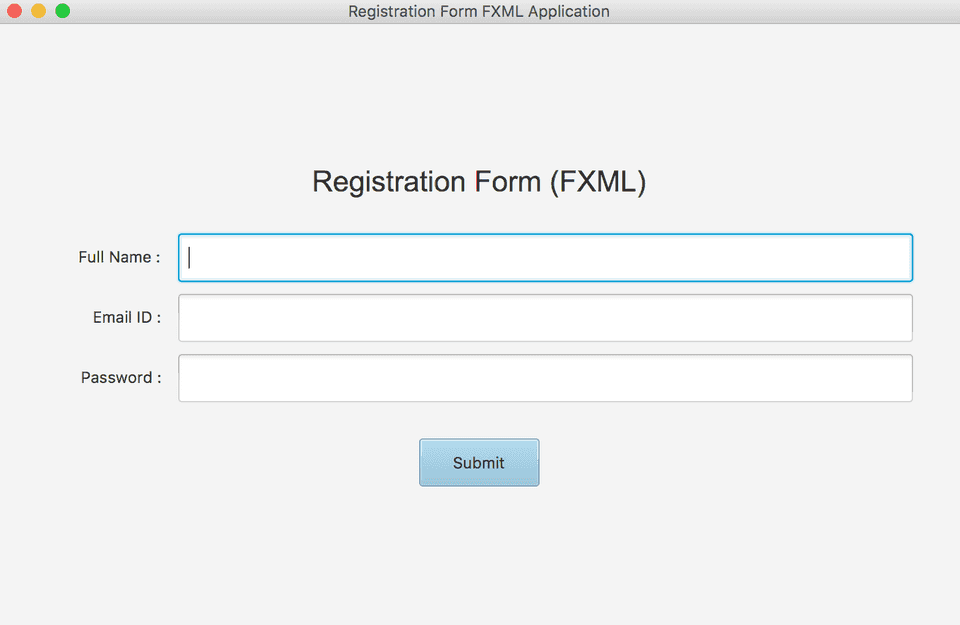
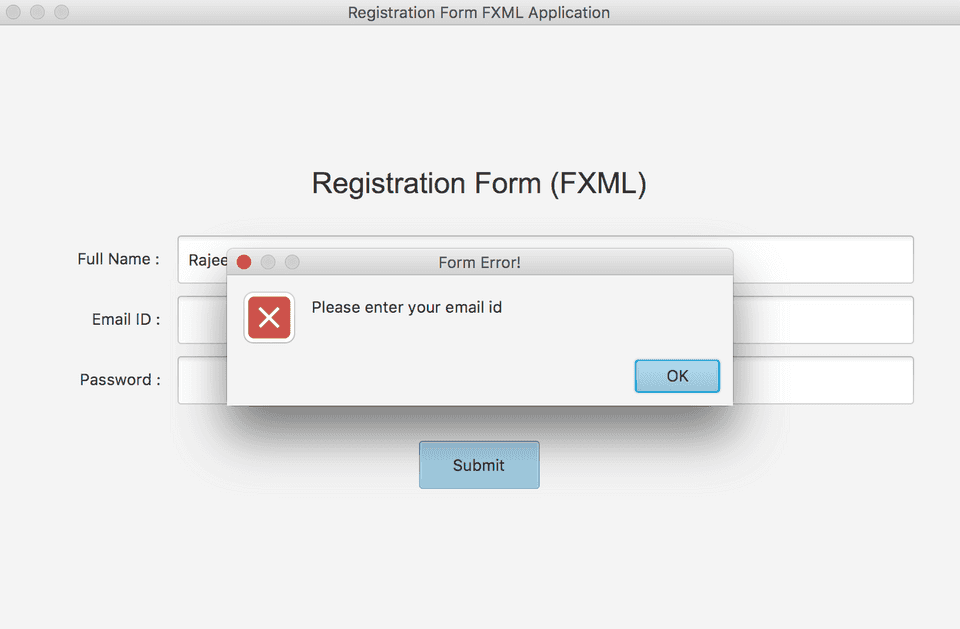
Following is the registration form application that we’re going to build in this tutorial using FXML -
Structure of a JavaFX FXML application
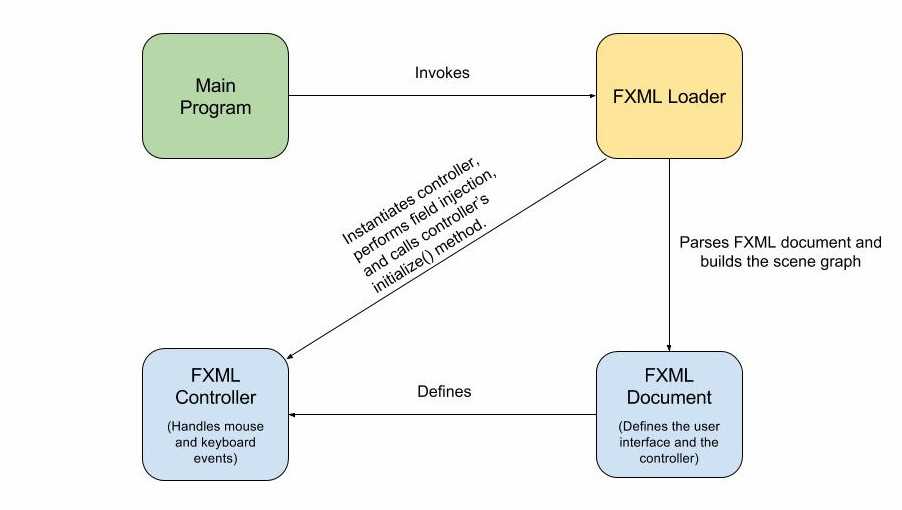
The above figure shows the structure of a typical JavaFX FXML application.
As depicted in the figure, the user interface of an FXML application is defined inside an FXML document and all the logic to handle input events are written inside a controller class.
The execution of the program begins with the Main class, which invokes the FXML loader. The FXML loader parses the FXML document, instantiates the nodes specified in the document, and builds the scene graph.
After building the scene graph, the FXML loader instantiates the controller class, injects the fields defined in the controller class with objects instantiated from the fxml document and then calls the controller’s initialize() method.
Create Source Files
Open your favorite IDE and create a new Java project called javafx-registration-form-fxml.
After creating the project, create three files - RegistrationFormApplication.java, RegistrationFormController.java and registration_form.xml in a package named javafx.example.
javafx-registration-form-fxml
    └── src
         └── javafx
               └── example
                     └── RegistrationFormApplication.java
                     └── RegistrationFormController.java
└── registration_form.xmlRegistrationFormApplication.javais the Main Application class.registration_form.xmlis the FXML Document that will contain the user interface for the application, andRegistrationFormController.javais the FXML Controller which will be used to write event handler code.
Load FXML Document into Main Class
Let’s first write the Main application class. As usual, For creating a JavaFX application, we’ll need to extend our Main class from javafx.application.Application and override its start() method.
package javafx.example;

import javafx.application.Application;
import javafx.fxml.FXMLLoader;
import javafx.scene.Parent;
import javafx.scene.Scene;
import javafx.stage.Stage;

public class RegistrationFormApplication extends Application {

    @Override
    public void start(Stage primaryStage) throws Exception{
        Parent root = FXMLLoader.load(getClass().getResource("registration_form.fxml"));
        primaryStage.setTitle("Registration Form FXML Application");
        primaryStage.setScene(new Scene(root, 800, 500));
        primaryStage.show();
    }


    public static void main(String[] args) {
        launch(args);
    }
}
The main class is pretty straight forward. We first load the FXML document using FXMLLoader. This gives us a reference to the root node of the user interface.
After that, we create a Scene using the FXML root node and set the Scene into the primary stage.
Create the Layout of your Application
We’ll use JavaFX GridPane layout for designing the registration form. It enables you to create a flexible grid of rows and columns in which to lay out ui-controls.
<?import javafx.scene.layout.GridPane?>
<?import javafx.geometry.Insets?>
<?import javafx.scene.layout.ColumnConstraints?>
<?import javafx.scene.control.Label?>
<?import javafx.scene.text.Font?>
<?import javafx.scene.control.TextField?>
<?import javafx.scene.control.PasswordField?>
<?import javafx.scene.control.Button?>

<GridPane fx:controller="javafx.example.RegistrationFormController"
          xmlns:fx="http://javafx.com/fxml" alignment="center"
          hgap="10" vgap="10">
    <padding><Insets top="40" right="40" bottom="40" left="40"/></padding>
    <columnConstraints>
        <ColumnConstraints minWidth="100" prefWidth="100"
                           maxWidth="Infinity" halignment="RIGHT">
        </ColumnConstraints>
        <ColumnConstraints minWidth="200" prefWidth="200"
                           maxWidth="Infinity" hgrow="ALWAYS">
        </ColumnConstraints>
    </columnConstraints>
</GridPane>
In the above FXML document, We create a GridPane layout which is center aligned and has a horizontal and vertical gap of 10.
We also specify a padding of 40px on each side. The layout also defines the controller that will be used to handle any mouse or keyboard events using fx:controller property.
The columnConstraints specified in the document allows us to add a constraint to all the UI controls placed in that column.
The first column constraint applies to the UI controls placed in the first column and second column constraint applies to UI controls placed in the second column.
As per the above constraints, all the ui controls placed in the first column will be right aligned and will have a minimum width of 100 and a preferred width of 100.
Similarly, all the ui controls placed in the second column will have a minimum width of 200 and preferred width of 200.
Also, we have set the value of hgrow property in the second column constraint to ALWAYS. This property specifies that the UI controls in the second column will grow horizontally and fill in extra space if the screen is resized.
Add UI Controls to the registration form
The GridPane is empty right now. Let’s add Labels, Text Fields and Password Fields to build the registration form.
<?import javafx.scene.layout.GridPane?>
<?import javafx.geometry.Insets?>
<?import javafx.scene.layout.ColumnConstraints?>
<?import javafx.scene.control.Label?>
<?import javafx.scene.text.Font?>
<?import javafx.scene.control.TextField?>
<?import javafx.scene.control.PasswordField?>
<?import javafx.scene.control.Button?>

<GridPane fx:controller="javafx.example.RegistrationFormController"
          xmlns:fx="http://javafx.com/fxml" alignment="center"
          hgap="10" vgap="10">
    <padding><Insets top="40" right="40" bottom="40" left="40"/></padding>
    <columnConstraints>
        <ColumnConstraints minWidth="100" prefWidth="100"
                           maxWidth="Infinity" halignment="RIGHT">
        </ColumnConstraints>
        <ColumnConstraints minWidth="200" prefWidth="200"
                           maxWidth="Infinity" hgrow="ALWAYS">
        </ColumnConstraints>
    </columnConstraints>

    <!-- Add Header Label -->
    <Label text="Registration Form (FXML)" GridPane.columnIndex="0"
           GridPane.rowIndex="0" GridPane.columnSpan="2"
           GridPane.rowSpan="1" GridPane.halignment="CENTER" >
        <font>
            <Font name="Arial" size="24" ></Font>
        </font>
        <GridPane.margin>
            <Insets top="20" right="0" bottom="20" left="0"></Insets>
        </GridPane.margin>
    </Label>


    <!-- Add Name Label -->
    <Label text="Full Name : " GridPane.columnIndex="0"
           GridPane.rowIndex="1" >
    </Label>
    <!-- Add Name Text Field -->
    <TextField fx:id="nameField" prefHeight="40"
               GridPane.columnIndex="1" GridPane.rowIndex="1"/>


    <!-- Add Email Label -->
    <Label text="Email ID : " GridPane.columnIndex="0"
           GridPane.rowIndex="2" >
    </Label>
    <!-- Add Email Text Field -->
    <TextField fx:id="emailField" prefHeight="40"
               GridPane.columnIndex="1" GridPane.rowIndex="2"/>


    <!-- Add Password Label -->
    <Label text="Password : " GridPane.columnIndex="0"
           GridPane.rowIndex="3" >
    </Label>
    <!-- Add Password Field -->
    <PasswordField fx:id="passwordField" prefHeight="40"
                   GridPane.columnIndex="1" GridPane.rowIndex="3"/>


    <!-- Add Submit Button -->
    <Button fx:id="submitButton" text="Submit"
            prefWidth="100" prefHeight="40" defaultButton="true"
            GridPane.columnIndex="0" GridPane.rowIndex="4"
            GridPane.columnSpan="2" GridPane.rowSpan="1"
            GridPane.halignment="CENTER"
            onAction="#handleSubmitButtonAction">
        <GridPane.margin>
            <Insets top="20" right="0" bottom="20" left="0"></Insets>
        </GridPane.margin>
    </Button>
</GridPane>
The above FXML document is self-explanatory.
GridPane.columnIndex and GridPane.rowIndex properties allow us to place ui controls in a particular cell.
GriPane.columnSpan and GridPane.rowSpan properties are used to indicate that the ui control will span multiple columns/rows.
The Submit button has an onAction property which calls a method named handleSubmitButtonAction. This method has to be defined in the FXML controller and that’s what we’re gonna do next.
Write code to handle Submit event inside the controller
package javafx.example;

import javafx.event.ActionEvent;
import javafx.fxml.FXML;
import javafx.scene.control.Alert;
import javafx.scene.control.Button;
import javafx.scene.control.PasswordField;
import javafx.scene.control.TextField;
import javafx.stage.Window;

public class RegistrationFormController {
    @FXML
    private TextField nameField;

    @FXML
    private TextField emailField;

    @FXML
    private PasswordField passwordField;

    @FXML
    private Button submitButton;

    @FXML
    protected void handleSubmitButtonAction(ActionEvent event) {
        Window owner = submitButton.getScene().getWindow();
        if(nameField.getText().isEmpty()) {
            AlertHelper.showAlert(Alert.AlertType.ERROR, owner, "Form Error!",
                    "Please enter your name");
            return;
        }
        if(emailField.getText().isEmpty()) {
            AlertHelper.showAlert(Alert.AlertType.ERROR, owner, "Form Error!",
                    "Please enter your email id");
            return;
        }
        if(passwordField.getText().isEmpty()) {
            AlertHelper.showAlert(Alert.AlertType.ERROR, owner, "Form Error!",
                    "Please enter a password");
            return;
        }

        AlertHelper.showAlert(Alert.AlertType.CONFIRMATION, owner, "Registration Successful!",
                "Welcome " + nameField.getText());
    }
}
Note that the FXMLLoader will automatically inject values defined in the FXML document into corresponding references in the controller class.
So, the nameField, emailField, passwordField and submitButton references specfied in the above controller will automatically be injected by the objects created from the FXML document.
The @FXML annotation is mandatory for private member fields of the controller class, otherwise, field injection won’t work. However, it can be omitted for public fields.
For identifying which fxml element should be injected into which member field, the FXML loader matches the fx:id attribute of the fxml element with the name of the member field.
The handleSubmitButtonAction() method contains the code to handle form submit. Since this method is not public, it must be annotated with @FXML, so that it can be used in the fxml document.
I have used a showAlert() helper method in the controller to show success/error alerts to the user. Following is the code for the helper method -
package javafx.example;

import javafx.scene.control.Alert;
import javafx.stage.Window;

public class AlertHelper {

    public static void showAlert(Alert.AlertType alertType, Window owner, String title, String message) {
        Alert alert = new Alert(alertType);
        alert.setTitle(title);
        alert.setHeaderText(null);
        alert.setContentText(message);
        alert.initOwner(owner);
        alert.show();
    }
}
Complete Code and Output
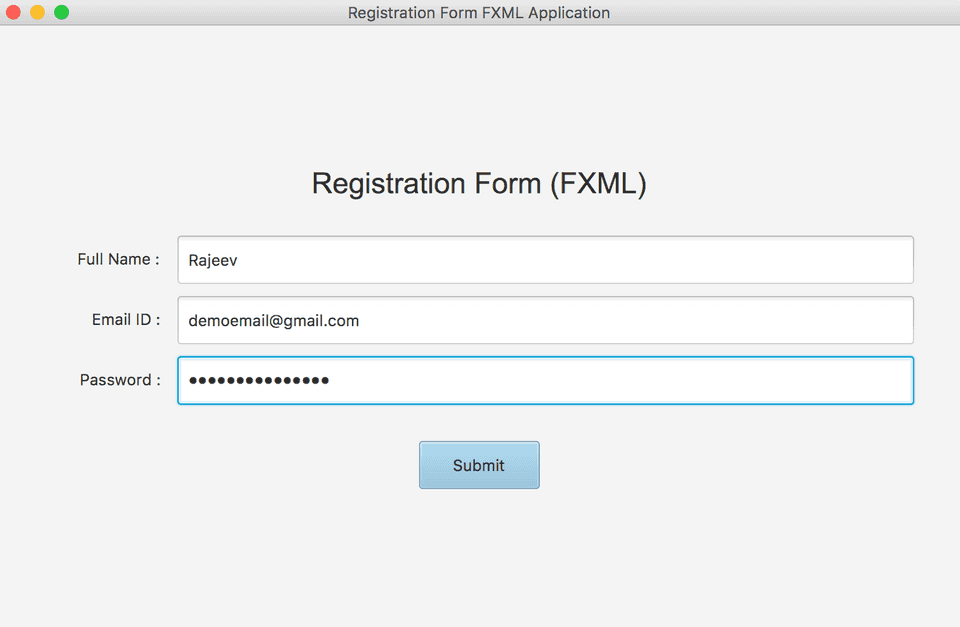
You can download the complete code for the registration form application from my github repository. Feel free to make changes to the code and use it in your projects. Following are some screenshots of the application we just built -
Registration Form -
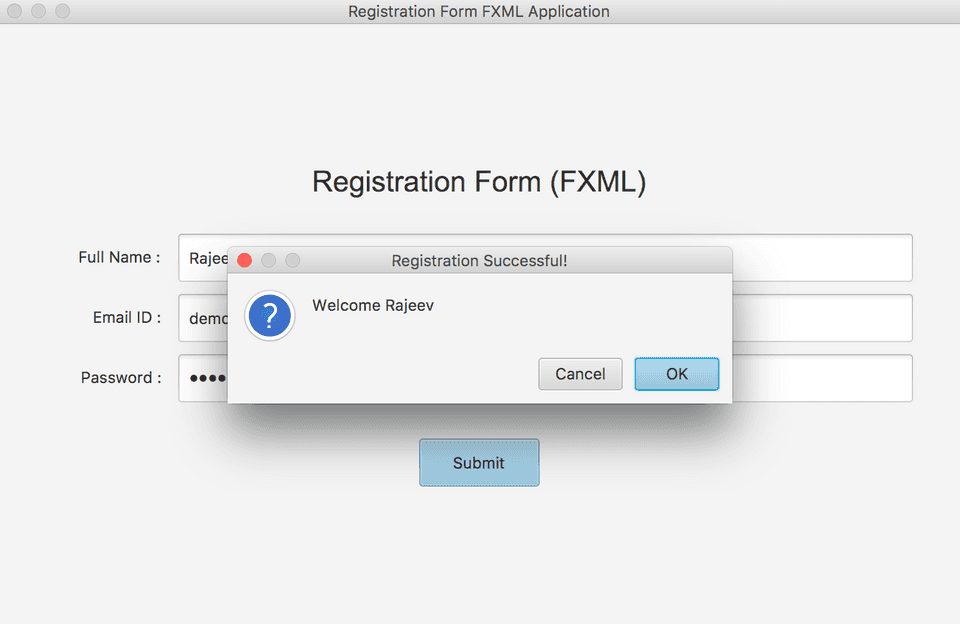
Once user clicks submit, a confirmation alert is shown -
Showing error if any form field is missing -
Conclusion
In this blog post, I explained how to create user interfaces for your JavaFX application using FXML. FXML is a powerful tool and it helps us keep the code clean and easier to maintain by separating the application design from application logic. You can find all the code for the application we built in this tutorial on my github repository.
In this tutorial, We used JavaFX’s GridPane layout to create the registration form. In the next blog post, We’ll explore several other built-in layout panes provided by JavaFX.
As always, Thank you for reading my blog. Please ask any doubts or clarifications in the comment section below.
